
Want your no-code app to load faster and perform better? Adding a CDN (Content Delivery Network) is the answer. A CDN speeds up your app by caching static assets (like images, CSS, and JavaScript) on servers located closer to your users. This reduces load times, improves user experience, and even helps with SEO.
Here’s what you need to know:
- What is a CDN? A network of global servers that delivers content faster by caching it near users.
- Why use a CDN? Faster load times, better user retention, and improved search rankings.
- How does it work? CDNs cache static files and serve them from the nearest server, reducing latency.
- Steps to integrate a CDN:
- Create an account with a CDN provider (e.g., Cloudflare or DigitalOcean).
- Configure your app’s connection to the CDN by updating DNS settings.
- Organize static assets with versioned URLs and set cache headers.
- Test the setup to ensure everything works correctly.
“We’ve seen apps feel noticeably faster almost overnight after adding a CDN. Screens load quicker, images appear instantly, and users stop complaining about lag — especially on mobile data.” Ian Naylor, founder of AppInstitute
Preparing Your No-Code App for CDN Integration
Before diving into CDN integration, it’s crucial to evaluate your app’s content and organize it in a way that ensures both optimal performance and robust security.
Identify Your App’s Content Delivery Needs
Start by distinguishing between static assets – like images, CSS, JavaScript files, videos, and fonts – and dynamic content, such as database queries, authentication processes, and user sessions. CDNs are designed to handle static assets, so focus on those for integration. As Hanif Jetha explains:
CDNs are most commonly used to deliver web pages and their related files, streaming video and audio, and large software packages.
To pinpoint which assets are slowing down your app, use tools like Google PageSpeed Insights or Pingdom. These tools can help identify content that would benefit from CDN delivery. Additionally, take your user base into account. If users are geographically dispersed, a CDN can significantly reduce latency. However, Jetha cautions:
If your bottleneck is CPU load on the origin server, and not bandwidth, a CDN may not be the most appropriate solution.
Organize your content based on how frequently it’s updated to set cache expiration times effectively. For example, Google Cloud Documentation suggests categorizing content by update frequency:
One method for choosing the expiration is to categorize content based on how often you update the content.
Here’s a general guideline:
- Use a short expiration (e.g., 5 seconds) for near real-time data like live feeds.
- Opt for a moderate expiration (around one hour) for frequently updated content.
- Assign a long expiration (72 hours or more) for assets like logos or core CSS files that rarely change.
Select a CDN Provider
Choosing the right CDN provider means considering factors like global coverage, security features, and compatibility with your no-code platform. A provider with a broad network of Points of Presence (PoPs) ensures faster delivery for users worldwide.
Security is equally important. Look for providers offering DDoS protection, enterprise-grade firewalls, and comprehensive SSL/HTTPS encryption between users, the CDN, and your origin server. Performance can also get a boost with modern protocols like HTTP/3 and QUIC. For instance, implementing TLS early data could improve resumed connection rates by 30% to 50%.
Billing models vary, so choose what works best for your needs. Some providers charge based on bandwidth usage, while others offer fixed monthly pricing for predictable costs. Many also provide free tiers or credits for testing. For example, Google Cloud offers $300 in free credits for proof-of-concept trials. If your no-code backend uses app-specific hostnames, ensure the CDN supports features like “Host override” to maintain header consistency.
Once you’ve selected a provider, prepare your assets to simplify the integration process.
Organize Static and Dynamic Assets
After selecting your CDN provider, it’s time to organize your files for seamless integration. Store static assets in dedicated cloud storage buckets, keeping them separate from private or sensitive content. This reduces the risk of accidentally caching data you don’t want exposed.
Use versioned URLs (e.g., “style_v2.css” or “/v100/logo.png”) to trigger CDN updates when content changes. As Google Cloud advises:
Instead of updating existing files, upload new versions. For new files, use unique names that can include version numbers or dates.
This approach ensures the CDN immediately fetches updated content instead of waiting for the cache to expire.
Define a global variable for your CDN (e.g., cdnURL = "https://cdn.example.com/") and prepend it to all static resource URLs. As David Attard explains on CSS-Tricks:
Every static resource needs to get the cdnURL variable prepended to it.
This step ensures that browsers request those assets directly from the CDN rather than your origin server. Finally, configure Cache-Control headers with specific max-age values to tell the CDN how long to store different types of content.
How to Add a CDN to Your No-Code App
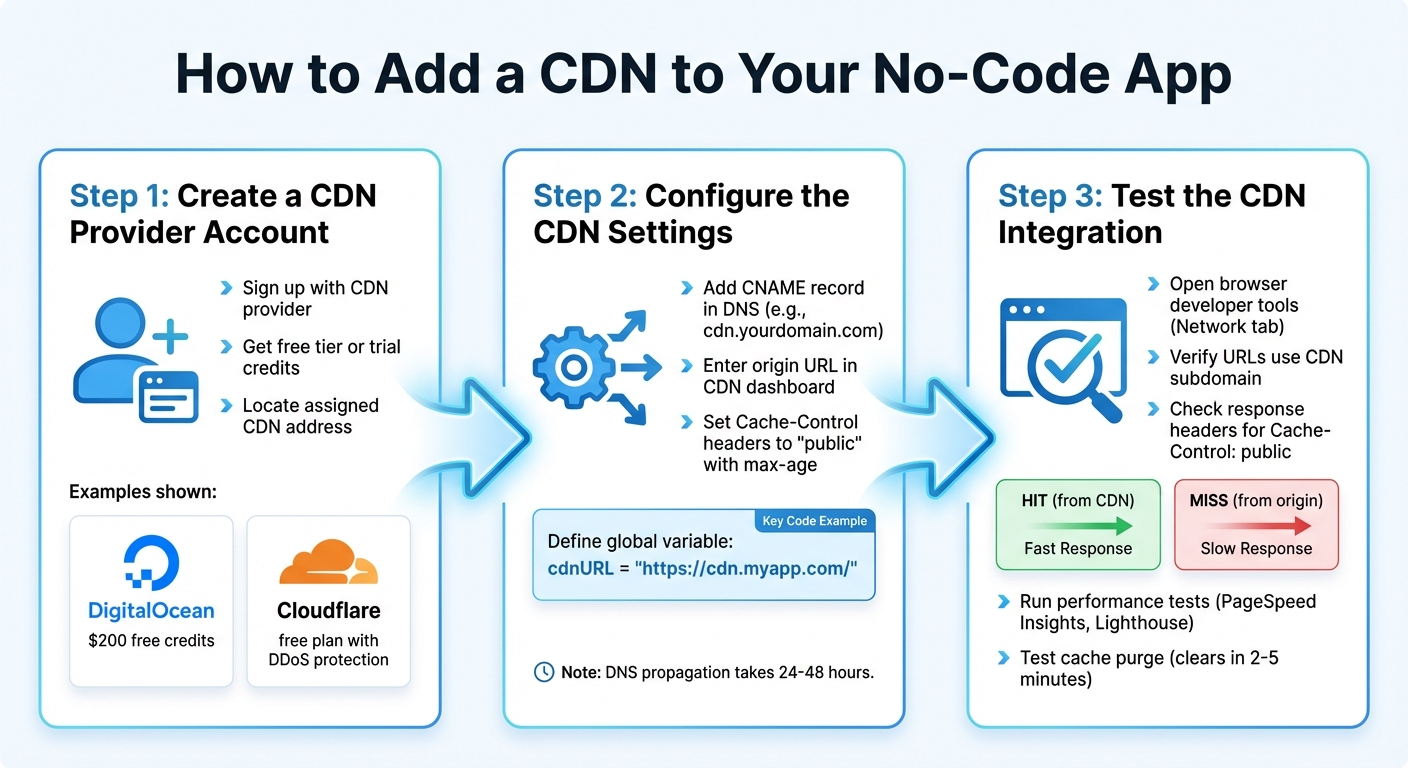
How to Add a CDN to Your No-Code App: 3-Step Integration Process
Once your assets are organized and you’ve chosen a CDN provider, it’s time to integrate the service with your app. This involves three key steps: setting up an account, configuring your app’s connection to the CDN, and ensuring everything functions as expected.
Step 1: Create a CDN Provider Account
Begin by signing up with your selected CDN provider. Many providers offer free tiers or trial credits to help you get started. For instance, DigitalOcean gives new users $200 in free credits, which can be used for hosting and CDN services. Similarly, Cloudflare offers a free plan with features like DDoS protection and CDN services, making it ideal for small to medium no-code apps.
Once you’ve signed up, log in to your CDN dashboard and locate your assigned CDN address – this is often a URL like cdn-provider.net or a custom subdomain. If you’re using a platform like Kinsta, the CDN might already be integrated at no extra cost for hosted applications.
With your account set up, you’re ready to configure the connection between your app and the CDN.
Step 2: Configure the CDN Settings
To link your app with the CDN, start by adding a CNAME record in your domain’s DNS settings. This points a subdomain (e.g., cdn.yourdomain.com) to your CDN provider’s address. If you’re using a platform like AppInstitute, make these updates through your domain registrar.
Next, enter your app’s origin URL within the CDN dashboard. This URL directs the CDN to your original files. For no-code platforms, it’s often the app’s default URL, such as app-name.platform.app or a unique application ID. Some CDNs may require a “Host override” setup to ensure the Host header matches the expected hostname, which is essential for fetching files from your app’s backend.
Set Cache-Control headers to public with an appropriate max-age (in seconds). This determines how long assets remain cached before refreshing from the origin server. Update all asset URLs in your app to use the CDN subdomain. To make future updates easier, define a global variable like cdnURL = 'https://cdn.myapp.com/'.
Keep in mind that DNS propagation can take 24–48 hours to fully update across the global domain name system. If the CDN doesn’t appear to work immediately, give it time.
Step 3: Test the CDN Integration
To verify the integration, open your browser’s developer tools and go to the Network tab. Reload your app and check the URLs for static assets like images, CSS, and JavaScript. Ensure they’ve been updated to your CDN subdomain (e.g., app.com/image.jpg should now appear as cdn.app.com/image.jpg).
Check the response headers for each asset. Look for Cache-Control: public with the correct max-age value. Additionally, verify the cache status – “HIT” means the file was served from the CDN cache, while “MISS” indicates it was fetched from your origin server.
Run performance tests using tools like Google PageSpeed Insights or Lighthouse to measure your app’s speed before and after adding the CDN. Focus on improvements in Core Web Vitals and overall response times. To test cache invalidation, update a file on your origin server and use the “Purge Cache” option in your CDN dashboard. The cache should clear within 2 to 5 minutes across all global data centers. Using versioned filenames can help ensure updated files are served without relying solely on cache purging.
Once everything is working smoothly, you can start implementing additional best practices to maximize your CDN’s performance.
“In our experience, CDNs become critical the moment an app starts growing. Once traffic increases or users are spread across regions, a CDN is often the difference between smooth performance and random slowdowns.” David Hall, CEO AppInstitute
sbb-itb-539ae66
Best Practices for CDN Use with No-Code Apps
Follow these best practices to enhance your app’s performance and ensure its security.
Optimize Your Static Assets
Efficiently managing static assets can significantly improve CDN performance. Start by categorizing your content based on how often it changes. For assets like logos and core CSS files that rarely update, set long cache durations – weeks or even months. For content that changes frequently, like blog posts or product updates, use moderate cache times (about one hour). For near real-time data, such as live sports scores, opt for short time-to-live (TTL) values (around five seconds).
To ensure users always see the latest version of your content, use versioned URLs like style.css?v=1.1 or image_v2.jpg. This forces the CDN to fetch updated files as soon as they’re available. As Google Cloud points out:
Versioning content serves a different version of the same content, effectively removing it by showing users new content before the cache entry expires.
Reduce file sizes by minifying JavaScript and CSS and enabling compression methods like Gzip or Brotli – Gzip alone can shrink files by 50% to 70%. When uploading new files, perform atomic updates by first uploading them with a temporary name and renaming them only after the upload is complete. This prevents the CDN from caching incomplete files.
For different types of assets, use the right CDN configurations: Pull Zones for frequently updated files like HTML, CSS, and JavaScript, and Push Zones for large, seldom-updated files like videos and PDFs. Also, enable HTTP/3 and QUIC in your CDN settings to improve delivery speeds, especially for mobile users.
“One of the biggest surprises was how easy it was to add a CDN to a no-code app. You get the same performance benefits as custom-built apps, without the infrastructure headaches.” Sarah – AppInstitute Customer
Monitor Performance Regularly
Once your assets are optimized, keep a close eye on performance to address issues quickly. Enable detailed logging and monitor real-time metrics like cache hit ratio (CHR), latency, and throughput. If your CHR is low, it may indicate problems with your cache keys or TTL settings. Tools like cURL can help you inspect cache response headers and troubleshoot delivery issues.
Use your analytics dashboard to pinpoint regions or specific assets with high latency or frequent cache misses. Keep in mind that content not accessed for 30 days is often removed from CDN cache servers. To evaluate your app’s global availability and latency, review reports from independent providers like Citrix Radar.
Secure Your App with SSL and HTTPS
Along with performance monitoring, securing your app’s content delivery is essential for protecting both your app and its users. Configure encryption for both client-to-edge (user to CDN) and edge-to-origin (CDN to your app server) connections. Many CDN providers offer managed SSL certificates that are automatically issued and renewed.
For a free TLS certificate, consider using a Certificate Authority like Let’s Encrypt. Set your CDN to Full SSL or Strict mode, requiring a valid SSL certificate on your origin server. To protect your origin server, use private authentication methods or IP allowlisting so only the CDN can access it. For sensitive assets, implement signed URLs to provide time-limited access.
Enable TLS early data to boost the rate of resumed connections by 30% to 50%. Additionally, ensure that HTTP Strict Transport Security (HSTS) headers are in place so browsers only interact with your app over HTTPS. Using modern protocols like HTTP/3 and QUIC can further enhance both security and performance.
Conclusion
A CDN can dramatically improve your app’s performance by caching content on edge servers closer to your users, which reduces load times and minimizes latency. As BlazingCDN explains:
“Integrating a CDN into your web infrastructure is not just about speed; it’s about providing a seamless, efficient, and secure user experience.”
But it’s not just about speed. CDNs are built to handle heavy traffic, keeping your app running smoothly even during sudden spikes in demand. They also come with added security perks like DDoS protection and SSL/TLS encryption, safeguarding both your app and its users while helping to lower bandwidth costs. All of these features contribute to creating a more scalable and reliable app.
If you’re ready to take the next step, consider building a professional no-code mobile app with AppInstitute. Their platform offers industry-specific templates, an easy-to-use drag-and-drop editor, and support for iOS, Android, and PWAs. Starting at just $49/month, you can design and launch apps that deliver top-notch performance and a great user experience.
FAQs
How can I pick the best CDN for my no-code app?
Choosing the right CDN for your no-code app boils down to understanding your app’s unique requirements. Start with global coverage and performance – a CDN with numerous edge locations across the U.S. and worldwide can deliver faster load times for your users, no matter where they are.
Next, prioritize security features. Look for options like SSL/TLS encryption and DDoS protection to safeguard your app and its users’ data. Pricing and scalability are equally important. Many CDNs offer free plans tailored for low-traffic apps, with flexible paid plans available as your app grows and demands increase.
Lastly, ensure the CDN integrates seamlessly with your no-code platform. For instance, platforms like AppInstitute make it simple to connect static assets – such as images or scripts – to an external CDN using their drag-and-drop tools, eliminating the need for coding.
By focusing on these essentials – performance, security, cost-effectiveness, and ease of integration – you can select a CDN that not only boosts your app’s speed and reliability but also fits comfortably within your budget.
What are the best practices for managing static and dynamic assets in a no-code app?
To boost your app’s performance, it’s essential to organize static assets for efficient caching. Store files that rarely change – like images, fonts, CSS, and JavaScript – in a dedicated folder, such as /static. Use versioned filenames like app-v1.2.css or logo-20240501.png. This setup allows you to apply long-term cache headers, enabling your CDN to quickly serve these files from edge locations. Before uploading, make sure to compress and minify your assets. Additionally, group files logically by type or feature with clear naming conventions, such as /static/home/hero-bg.jpg.
When it comes to dynamic assets, like API responses or user-generated content, consider a “network-first” or “stale-while-revalidate” strategy. Place these files in folders like /api or /dynamic. Configure your CDN to fetch fresh data from the origin while using cached versions as a fallback during network delays. Short-term cache settings can strike a balance between speed and keeping data up-to-date, ensuring changes are reflected promptly.
Lastly, versioning and invalidation are crucial for maintaining a seamless experience. For static files, update filenames or append query strings whenever changes are made. This signals the CDN to replace outdated versions. For dynamic content, use cache-busting tokens or automated invalidation processes to ensure updates reach users without delay. These approaches will help your no-code app deliver a fast and reliable experience, leveraging the CDN’s strengths to the fullest.
How can I securely and efficiently integrate a CDN into my no-code app?
To keep your CDN integration both secure and efficient, start by choosing a trusted CDN provider that supports HTTPS/TLS. This ensures all traffic is encrypted, safeguarding your data. Configure the CDN to cache only the routes you need, like API endpoints, while blocking sensitive paths to minimize vulnerabilities.
Set up smart cache controls to strike a balance between speed and content freshness. For example, use settings like public, max-age=30, stale-while-revalidate=3600, stale-if-error=36000. For static files such as images, CSS, and JavaScript, a Cache-First approach works best. For dynamic data, implement Stale-While-Revalidate to deliver content quickly while refreshing it behind the scenes.
Make sure to enable health checks so the CDN only serves content when your app is functioning properly. Also, configure automatic cache invalidation to update data whenever changes are made. Keep an eye on performance metrics and security logs regularly to fine-tune delivery and address any potential issues quickly. By following these steps, you’ll ensure your no-code app benefits from a fast, reliable, and secure CDN setup.
Related Blog Posts
- How to Build an App Without Coding Skills
- 5 Tips for Scaling No-Code Apps
- Ultimate Guide to Faster Drag-and-Drop App Development
- How To Optimize Images for No-Code Apps
Last Updated on January 23, 2026 by Becky Halls
0 thoughts on “How to Add a CDN to Your No-Code App”