
Understanding your users’ needs is key to improving your app. In-app feedback lets you gather real-time insights while users are actively engaged. Compared to traditional email surveys, in-app surveys boast response rates up to 27.52% and completion rates of 24.84%. This guide breaks down five steps to seamlessly integrate feedback tools into your app:
- Set Goals & Choose Your Audience: Define what you want to learn (e.g., usability issues, bugs) and target the right user groups at the right moments.
- Select Feedback Tools: Use no-code options like star ratings, NPS surveys, or text fields for ease of setup and analysis.
- Add Feedback Features: Integrate tools directly into your app using platforms like AppInstitute, which require no coding.
- Time Requests Correctly: Ask for feedback during natural breaks, like after purchases or milestones, and keep surveys short.
- Review & Act on Feedback: Group feedback, identify patterns, and implement changes. Inform users about updates to build trust.
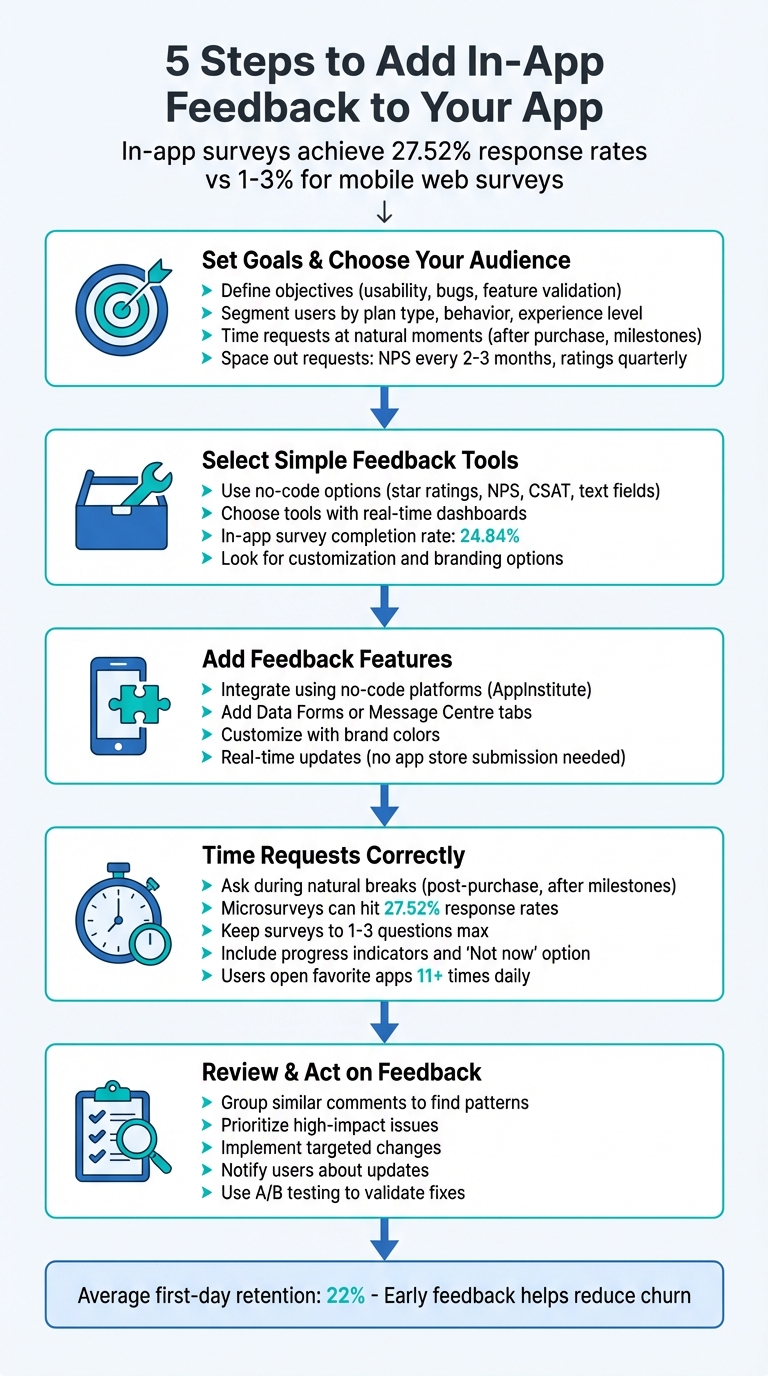
5 Steps to Add In-App Feedback to Your App
Step 1: Set Your Feedback Goals and Choose Your Audience
Define What You Want to Learn
Before reaching out to users, it’s crucial to set clear objectives that align with your app’s current challenges or growth priorities. Without a clear focus, the feedback you gather may lack actionable value.
A good starting point is to look at user experience and usability. Where are users getting stuck, confused, or frustrated? Pinpoint these areas to understand what’s holding them back. Another key area is bug detection – real-time user reports can catch crashes or glitches that internal testing might have overlooked. Additionally, feedback can help validate your product roadmap, ensuring you’re investing in features users actually want. Metrics like NPS (Net Promoter Score), CSAT (Customer Satisfaction), or CES (Customer Effort Score) can also provide a snapshot of your app’s overall health.
The secret to meaningful feedback lies in forming a clear hypothesis before launching a survey. For instance, ask yourself questions like, “Why are users abandoning their carts at checkout?” or “What’s stopping new users from completing onboarding?” These hypotheses will help you craft questions that are specific and actionable.
Once you’ve nailed down your objectives, the next step is figuring out who to ask and when to ask them.
Pick the Right Users and Moments
To get the most useful insights, tailor your questions to specific user groups and moments. Start by segmenting your audience based on factors like plan type (free vs. premium), user behavior (completed certain actions), or experience level (beginner vs. advanced). This ensures your feedback aligns with your goals and avoids “selection bias,” where only the happiest or most frustrated users dominate the responses.
Timing is just as important as targeting the right users. Collect feedback at natural moments, like after a purchase, completing a task, or hitting a milestone. For example, if you’re investigating checkout issues, ask users immediately after they complete (or abandon) a transaction. If a crash occurs, that’s the perfect time to request a bug report. Be mindful not to interrupt users mid-task, and avoid asking for app ratings during a user’s first session – they haven’t had enough time to form an opinion yet.
Spacing out your requests is equally important to avoid overwhelming users. For instance, send NPS surveys every two to three months and app rating prompts once a quarter.
As Amplitude points out, knowing exactly when and where feedback was collected – like after a buggy feature – allows your team to zero in on specific problem areas rather than making broad changes that could unintentionally create new issues.
sbb-itb-539ae66
Step 2: Select Simple Feedback Tools
Explore No-Code Feedback Options
Once you’ve pinpointed what you want to learn and who you want to hear from, the next step is choosing the right tools to gather feedback. Here’s the great part: you don’t need a coding expert or a development team to get started. No-code tools, like the ones available on AppInstitute, let you effortlessly add surveys, rating systems, and feedback buttons using drag-and-drop modules.
Some popular no-code options include:
- Star-rating systems: A quick way to gauge sentiment with a 1–5 star scale.
- NPS (Net Promoter Score) or CSAT (Customer Satisfaction) surveys: Use numerical scales to measure loyalty or satisfaction.
- Open-ended text fields: Perfect for gathering detailed, qualitative feedback.
Certain tools even offer clever features like “shake-to-send”, which allows users to report bugs simply by shaking their device – keeping your app interface clean and uncluttered. If you’re using AppInstitute’s editor, you can seamlessly integrate these feedback modules into your app’s layout without writing a single line of code.
Once you’ve chosen your tools, it’s all about timing. Deploy surveys strategically – like after a user completes their first purchase or reaches a key milestone. This ensures you’re capturing feedback when it’s most relevant.
Pick Tools That Are Simple to Use
The best feedback tools are easy for your users to interact with and straightforward for your team to analyze. Complicated or clunky surveys can lead to abandoned responses, costing you valuable insights. Look for tools that allow for customization so you can match the design to your app’s branding, ensuring the feedback feature feels like a natural part of the experience.
On the backend, prioritize tools with real-time dashboards and analytics. These will help you quickly spot trends, segment responses, and even link feedback to session replays for deeper insights. Features like real-time notifications via Slack or email can alert you to negative reviews so you can act fast.
In-app surveys, in particular, perform exceptionally well. They boast response rates as high as 27.52% and completion rates around 24.84%, far surpassing the 1–3% response rates typical of mobile web surveys. As the team at Luciq/Instabug explains:
“In-app surveys aim to tackle [low response rates] by reducing friction… Keeping people in your app increases the chance that users will participate.”
Step 3: Add Feedback Tools to Your App
Add Feedback Features to Your App
After selecting your feedback tools, the next step is to integrate them into your app. If you’re using AppInstitute’s no-code platform, this process is simple. Head to the “Tabs” section in the AppBuilder, click on “+Add Tabs”, and select “Data Forms” or “Message Centre.” Then, hit “+ Add to App” to include the feedback feature in your app’s interface.
Once you’ve added the tab, you can customize it using the “Tab Editor.” Click “Edit Content” to set up your feedback form with the exact questions and input fields you need, such as star ratings, text boxes, or satisfaction scales. You can also rearrange your app’s menu by dragging and dropping the tabs into the desired order and renaming the tab to something user-friendly like “Feedback” or “Share Your Thoughts.” To make the feature visually consistent with your app, use the Color Scheme tool to match your brand’s colors directly from your website URL.
One of the standout features of AppInstitute is its real-time editing capability. Any changes you make are updated instantly for your users – no need to go through a manual app store update. This is especially handy if you’re working with a Progressive Web App (PWA). With your feedback feature set up, the next step is to encourage users to share their thoughts at just the right moments.
Create Triggers for Feedback Requests
Timing is everything when it comes to collecting meaningful feedback. Push notifications are a great way to prompt users, whether you send them as one-time messages, schedule them, or use geo-fencing to target users based on location.
The key is to time these prompts around natural breaks in the user experience. For instance, you might send a notification after a user completes their first purchase, hits a 30-day usage milestone, or finishes booking a service. Avoid interrupting users while they’re in the middle of a task – wait until they’ve completed an action. Once feedback starts rolling in, you can review it in the App Analytics section, where you’ll find detailed submission reports and response tracking for your custom forms.
Step 4: Time Your Feedback Requests Correctly
Pick the Best Time to Ask for Feedback
Now that your feedback tools are live, the next step is figuring out when to ask for feedback. Timing is everything. When done right – like during natural breaks in a user’s journey – response rates can soar. In-app surveys often see participation rates between 15–25%, and microsurveys can even hit 27.52%.
The key is to approach users during natural pauses, not while they’re in the middle of completing a task. Think about moments when users have just achieved something: completing a purchase, booking a service, or hitting a milestone like a 30-day streak. These moments are fresh in their minds, and they’re more likely to provide thoughtful and balanced feedback.
Context is just as important as timing. If you want feedback on the checkout process, ask right after the purchase is complete. Testing a new feature? Wait until users have had time to explore it before seeking their input. With nearly 50% of users opening their favorite apps over 11 times a day, you’ve got plenty of chances to find the right moment.
Avoid disrupting users when they’re focused on complex tasks – it’s frustrating and can lead to rushed or lower-quality responses.
Keep Feedback Requests Short and Clear
Once you’ve nailed the timing, the next step is to design a feedback request that users won’t ignore. Simplicity is your best friend here. Short, clear surveys are far more likely to keep users engaged.
Stick to one to three questions max to avoid overwhelming users. Surveys with just one question – like those using NPS (Net Promoter Score) or CSAT (Customer Satisfaction Score) – often see the best response rates. If you need more detailed insights, try progressive profiling: ask one or two questions now and follow up during future interactions.
Make it easy for users to respond by incorporating visual tools like star ratings, emojis, or thumbs up/down icons. Show the first question right away instead of hiding it behind a button – this small tweak can significantly boost engagement. For longer surveys, include a progress indicator (e.g., “Question 1 of 3”) so users know what to expect.
To encourage participation, explain why their feedback matters. A message like, “Your input will help shape our next feature” can make the request feel meaningful and not random. And don’t forget to include a clear “Not now” or exit option. Giving users control over their experience ensures your request doesn’t feel pushy or intrusive.
Step 5: Review Feedback and Make Changes
Sort and Review Your Feedback
Start by grouping similar comments and ratings to uncover patterns. For example, if several users mention that the checkout process is confusing, that’s a clear sign of an issue worth addressing. To make this process more efficient, tools like sentiment and text analysis can help identify recurring themes, especially when dealing with open-ended feedback. Pair this feedback with usage data to zero in on the most pressing problems.
Focus on feedback that has the greatest impact. For instance, an issue affecting 5% of your high-value customers might take priority over a suggestion from occasional users. Use structured methods, like a RUF Analysis, to determine whether reliability, usability, or functionality is at the root of the problem.
If you’re using AppInstitute, take advantage of its built-in analytics to monitor how users interact with features before and after implementing changes. Assign responsibility for each feedback theme to a specific team member to ensure no valuable insights slip through the cracks.
This careful analysis lays the groundwork for meaningful improvements.
Make Changes and Tell Users About Them
Once you’ve identified what needs fixing, focus on implementing targeted changes. But don’t stop there – let your users know about the updates. Communicating these changes not only shows you’re listening but can also transform frustrated users into loyal advocates. As Mikolaj Pawlikowski, a Site Reliability Engineer, puts it:
“The secret is that you can turn a customer who found a problem into your biggest supporter. Give them an easy way to report the issue, make it easy to gather all the context you need, and then keep them informed about the progress and appreciate their input.”
When updates are ready, notify users directly. Update release notes and use your CRM for personalized outreach to affected individuals.
Before rolling out changes widely, validate them using A/B testing or feature flags. This ensures the fixes actually solve the problem. Afterward, follow up with users to confirm the updates meet their expectations. This iterative process not only improves your product but also builds trust and fosters ongoing communication with your audience.
How to Create a Feedback System in Power Apps (No Code Tutorial)

Conclusion
In-app feedback is a powerful tool for building stronger connections with users and making smarter product decisions. By collecting real-time, contextual insights, surveys can achieve response rates as high as 27.52%. With the right tools, turning these insights into action becomes straightforward.
This feedback does more than just improve response rates – it plays a key role in reducing churn and increasing retention. For instance, even when first-day retention averages around 22%, early feedback can help identify and address issues before they escalate. Plus, it gives you insights from the “middle majority” of users who typically wouldn’t contact support, offering a fuller understanding of how your app is performing.
AppInstitute makes it simple to gather and act on this feedback with its no-code tools like Data Forms and Message Centers. Trusted by over 100,000 businesses, AppInstitute offers a 30-day free trial before plans start at $39/month, making it easy to integrate feedback systems without needing any coding expertise.
FAQs
How can I request user feedback without disrupting their experience?
To gather feedback without frustrating users, it’s all about timing, keeping it brief, and giving users control. Feedback prompts should appear only after users complete significant actions, like finishing a purchase or updating a setting, so you don’t interrupt their flow.
Pick moments that feel natural, such as when users pause, exit the app, or accomplish a goal. Keep the survey short – ideally just 1 to 3 questions – and make it easy for users to dismiss or postpone. Options like “Close” or “Remind me later” are essential, and avoid showing the same prompt repeatedly; waiting at least 30 days before asking again is a good rule of thumb.
If you’re working with AppInstitute’s no-code builder, adding a feedback widget is simple. You can configure it to appear at the right times without needing any coding skills. By respecting users’ time and preferences, you can gather meaningful insights without disrupting their experience.
What is the easiest way to add feedback features to my app without coding?
If you want to add feedback features without diving into code, a no-code app builder is the way to go. AppInstitute makes it simple to create apps for iOS, Android, and Progressive Web Apps (PWAs) with its easy-to-use drag-and-drop editor. You can quickly incorporate feedback features like star ratings, comment forms, and bug-report buttons into your app with just a few clicks. The platform takes care of all the technical work, so you can start gathering user feedback as soon as your app is live.
For more advanced feedback tools, AppInstitute also offers integrations with popular services like Refiner and UserVoice. You can connect these tools through the platform’s integration menu, giving your app enhanced feedback capabilities while keeping the no-code process straightforward. Whether you stick with the built-in options or explore external integrations, AppInstitute makes collecting user insights a breeze, helping you refine and improve your app with minimal effort.
How can I effectively share updates based on user feedback?
To communicate updates based on user feedback, start by analyzing the feedback to spot recurring themes or pressing issues. Prioritize updates that will make the biggest difference and can be implemented effectively. Once the changes are finalized, write clear and straightforward update notes that explain what was changed, why it’s important, and how it addresses user feedback.
Make sure to express gratitude to users who contributed their thoughts. Whether you thank individuals or offer a general acknowledgment, it’s a great way to show that their input matters. Share the update in a way that feels timely and relevant – like an in-app message or notification when users log in. To keep the feedback cycle alive, include a simple prompt like “Was this helpful?” so you can gather more reactions and keep improving the user experience.
Related Blog Posts
- How to Automate User Onboarding in Apps
- How to Manage Client Communication with No-Code Apps
- Ultimate Guide to Mobile App User Surveys
- How to Track In-App User Behavior
Last Updated on January 22, 2026 by Becky Halls
0 thoughts on “5 Steps to Add In-App Feedback to Your App”