
Connecting your no-code app to Asana can streamline your workflows by automating tasks and syncing data between platforms. For instance, when a customer interacts with your app, a task can automatically be created in Asana, assigned to the right person, and updated in real-time – eliminating manual updates.
Here’s how to set it up:
- Get the Essentials: You’ll need an AppInstitute subscription (starting at $49/month) and an Asana account with admin permissions to generate a Personal Access Token (PAT).
- Generate a PAT in Asana: Create a token in your Asana settings under the “Apps” tab. Save it securely – it’s your key to linking the platforms.
- Set Up Integration in AppInstitute: Enter your PAT and Workspace GID in the AppInstitute dashboard under the Integrations section.
- Map Fields: Match fields like task names, due dates, and assignees between both platforms to ensure accurate data flow.
- Test the Setup: Create test tasks to confirm everything syncs correctly. Adjust triggers and field mappings as needed.
How to Connect ASANA with N8N [AI Automation] (Step-by-step)

What You Need Before Starting
To connect your AppInstitute app with Asana, you’ll need a few essentials: your accounts, the right permissions, and a security token. The good news? No coding skills are required.
Accounts and Permissions You’ll Need
First, make sure you have an active AppInstitute subscription. Integration features are available starting with the Instant plan, which costs $49/month. Double-check that your plan supports third-party integrations. On the Asana side, you’ll need a valid account with access to the specific workspace or organization you want to link.
If you’re an admin in Asana, you’re all set to manage apps and control API access – especially important for organizations using the Enterprise+ tier. While regular users can generate a Personal Access Token (PAT), admins have more control over workspace-level integrations. The PAT acts as a long-term security credential, enabling AppInstitute to interact with Asana’s REST API on your behalf.
“Personal Access Tokens provide individuals with a low friction means to access the Asana API when writing scripts, working with command line utilities, or prototyping applications.” – Asana Help Center
How to Set Up API Access in Asana
Creating a Personal Access Token is simple. Start by clicking your profile photo in Asana’s top bar, then go to My Settings. Under the Apps tab, select Manage Developer Apps. Click + New Access Token (or + Create new token), give it a name like “AppInstitute Integration” for easy identification, and agree to the API terms.
Once the token is generated, copy it immediately – you’ll only see it once for security reasons. Save it somewhere secure, like a password manager. If you need your Workspace GID (Globally Unique Identifier) for field mapping, you can find it by visiting https://app.asana.com/api/1.0/workspaces while logged in.
It’s a good idea to periodically review the “Authorized” section in your Apps settings and remove any unused tokens or third-party apps to keep things secure.
With your Personal Access Token ready, you can now move on to configuring the integration in AppInstitute.
How to Connect Your No-Code App to Asana
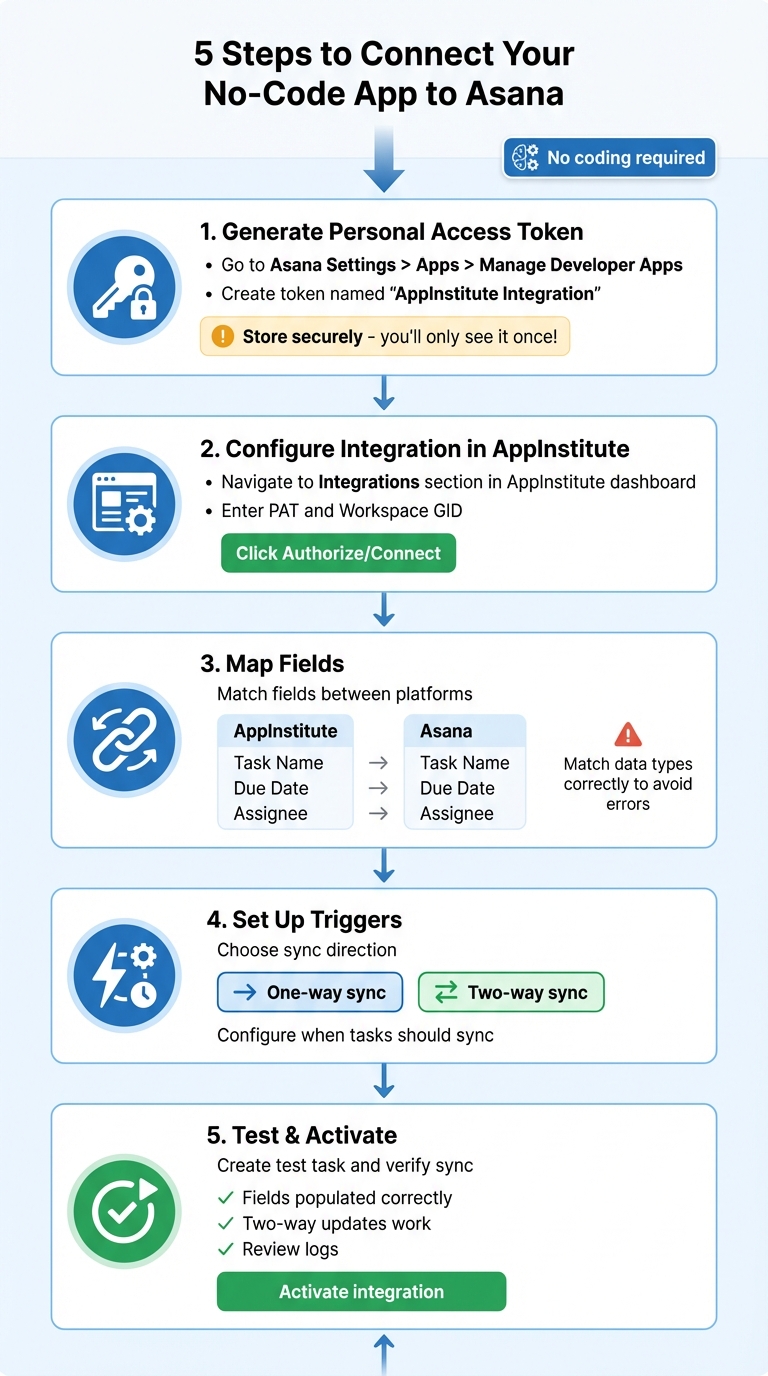
5 Steps to Connect No-Code Apps to Asana Integration Guide
With your Personal Access Token (PAT) ready, it’s time to link AppInstitute with Asana. Here’s a step-by-step guide to setting up a seamless, automated integration – no coding required. Just follow these five steps for precise field mapping and syncing.
Step 1: Generate an Asana Personal Access Token
Make sure your token is ready. If not, here’s how to create one:
Click on your profile photo in Asana, go to My Settings, switch to the Apps tab, and select Manage Developer Apps. Then, click + New Access Token, give it a descriptive name like “AppInstitute Integration”, and accept the API terms.
“Remember to keep your tokens secret and treat them just like passwords. Your tokens act on your behalf when interacting with the API.”
– Asana Developer Documentation
Store this token securely, such as in a password manager. It holds the same access level as your Asana account, meaning it can interact with any project you can view in Asana’s interface.
Step 2: Configure Integration in AppInstitute
Log in to your AppInstitute dashboard and navigate to the Integrations section, typically located under Settings or App Management. Locate the Asana integration option and select Connect or Add Integration. You’ll be prompted to enter your Personal Access Token – paste the token you saved earlier into the required field.
If needed, enter your Workspace GID. You can find this at https://app.asana.com/api/1.0/workspaces after logging in. Once your credentials are entered, click Authorize or Connect. AppInstitute will verify the token and establish a connection with your Asana workspace. A confirmation message will indicate that the integration is active, though additional setup may still be necessary.
Step 3: Map Fields Between AppInstitute and Asana
Field mapping is crucial to ensure data flows correctly between your app and Asana. In the integration settings, you’ll see a list of fields from both platforms. Start by mapping the basics – like linking Task Name in your app to Task Name in Asana, Due Date to Due Date, and Assignee to Assignee.
For custom fields, click the gear or settings icon next to each field to assign specific values. For instance, if your app uses a status field labeled “In Progress”, map it to Asana’s equivalent, such as “Incomplete” or a custom field you’ve created. Be mindful of matching data types correctly – text fields to text, dates to dates, and dropdowns to dropdowns – to avoid syncing errors.
If your app collects specialized data, syncing custom fields is often supported and can ensure this information appears in Asana tasks. Take your time with this step, as incorrect mapping is a common source of integration problems.
Step 4: Set Up Workflow Triggers and Sync Direction
Determine whether you want a one-way or two-way sync. A one-way sync automatically creates tasks in Asana when specific actions occur in your app, but updates won’t flow back. Two-way sync, on the other hand, ensures changes in either platform are reflected in both, which is ideal for collaborative teams.
Set up triggers to avoid syncing unnecessary actions. For example, you could create a rule that triggers only when a task is marked as “Milestone” or tagged as high-priority. You can also configure individual fields differently – like enabling one-way sync for task creation but two-way updates for fields such as Due Date and Assignee. Many platforms support real-time updates, so changes appear almost instantly after a trigger event. This automated setup minimizes manual updates, keeping workflows efficient.
Step 5: Test and Activate the Integration
Before going live, create a test task in your AppInstitute app and give it a clear label like “Test Integration.” Check that it appears in Asana with all mapped fields – assignee, due date, description, and any custom fields – correctly populated. If you’ve set up two-way sync, make changes in Asana and confirm they reflect back in your app.
Run through different scenarios: create tasks, update fields, assign tasks, and adjust due dates. Review the integration logs for any issues with mapping or permissions. Once everything checks out, proceed to live testing. After successful tests, remove any test labels, activate the integration, and bookmark the “Authorized” section in Asana for regular security checks to manage unused tokens.
sbb-itb-539ae66
Fixing Common Integration Problems
Common Issues and Solutions
Even with a proper setup, integration hiccups like authentication failures, data sync errors, or endpoint mismatches can crop up. Spotting these issues quickly will help you resolve them without much hassle.
Authentication errors are one of the most frequent problems. If you’re greeted with a “401 Unauthorized” message, it’s likely that your Personal Access Token (PAT) has expired or was entered incorrectly. For OAuth-based connections, double-check that your client_id and client_secret match exactly with the details in the OAuth tab. Also, ensure the redirect URI is identical to what you configured.
Field mapping failures often occur due to incorrect data formats. For example, dates must follow the ISO 8601 format (e.g., 2026-01-06 or 2026-01-06T14:30:00Z). Any other format will cause sync issues. When mapping custom fields like “status” or “priority”, make sure the values align with what Asana expects. If your app uses “In Progress” but Asana expects “Incomplete”, the sync will fail.
Sync delays or outright failures might happen if you’re using the wrong workspace or project ID (referred to as a GID in Asana). To find the correct GID, open the workspace or project in your browser and look for the numeric string in the URL (e.g., https://app.asana.com/0/1234567890/list). If you encounter a “Something went wrong” error in Asana’s interface, enabling Cross-Origin Resource Sharing (CORS) on your server can often resolve the issue.
Here’s a quick reference table to help troubleshoot common problems:
| Common Issue | Potential Cause | Recommended Solution |
|---|---|---|
| “401 Unauthorized” Error | Expired or invalid Personal Access Token | Regenerate the PAT in Asana’s Developer Console and re-enter it in your application. |
| Field Data Won’t Sync | Incorrect date format or mismatched field values | Use ISO 8601 format (YYYY-MM-DD) for dates and ensure custom field values match Asana’s options. |
| “Something went wrong” UI Error | Missing CORS headers on your server | Enable CORS on your server to allow requests from https://app.asana.com. |
| Tasks Not Appearing in Asana | Incorrect Workspace or Project GID | Copy the GID directly from the Asana browser URL. |
| Endpoints Not Triggering | URL path mismatch between Asana and server | Verify that the URL path in Asana matches your server endpoint exactly (e.g., /metadata vs /form/metadata). |
Lastly, ensure your server is accessible to the public. Local scripts won’t work with Asana since they can’t receive responses. If you’re still having trouble, try reinstalling the app by visiting https://app.asana.com/-/install_platform_ui_app?app_id=<app_client_id> – just replace <app_client_id> with your actual client ID.
Conclusion
Integrating no-code apps with Asana takes task management to the next level by cutting out manual updates and increasing productivity. By following five essential steps – creating a Personal Access Token, setting up the integration in AppInstitute, mapping fields accurately, configuring workflow triggers, and conducting thorough testing – you can ensure that your mobile app and Asana work seamlessly together. This automation provides your team with real-time visibility into project progress, eliminating the need to constantly switch between platforms.
But the advantages go far beyond saving time. Automated workflows not only free up hours for more important tasks but also improve collaboration across your team. Routine updates become part of a centralized system, creating a single source of truth for your projects and operations.
“Create one source of truth for your teams to focus and get work done.” – Asana
For small businesses, especially those with lean teams, this integration reduces missed deadlines, clarifies accountability, and supports growth without the need to hire additional administrative staff. In fact, setting up a basic automated workflow takes the average user less than 6 minutes. Whether it’s syncing customer data, monitoring project milestones, or managing cross-functional handoffs, connecting your AppInstitute app with Asana ensures that information moves where it’s needed – automatically. Together, these enhancements create a more efficient and responsive workflow.
Key Takeaways
This integration transforms small business operations in three key ways: automation eliminates repetitive tasks, real-time syncing keeps teams aligned with the latest updates, and centralized access improves collaboration by breaking down communication barriers and data silos. Start with a simple automation, test it thoroughly, and expand to more advanced workflows as your team grows comfortable with the system.
FAQs
What are the advantages of connecting a no-code app with Asana?
Integrating a no-code app with Asana turns your app into a smooth extension of your project management system. This integration lets teams access tasks, deadlines, and updates directly within the app, cutting out the hassle of switching between platforms. Thanks to an intuitive drag-and-drop workflow builder, setting it up is quick and doesn’t require any coding knowledge. Plus, it enables real-time syncing of data – like form submissions, status updates, or user actions – straight into Asana tasks.
This no-code connection doesn’t just simplify workflows; it also automates repetitive tasks, saving time and increasing efficiency. For instance, you can set it up to automatically create tasks when a user submits a form, update task statuses, or even post comments – all without writing a single line of code. These features streamline collaboration, speed up processes, and ensure data stays accurate, keeping your team organized and productive.
With AppInstitute’s no-code app builder, you can create a polished app for iOS, Android, or PWA and link it to Asana. This integration helps you build workflows that grow with your business, all while keeping costs low and development timelines short.
How can I securely connect my no-code app to Asana?
To securely link your no-code app built on AppInstitute to Asana, start by creating a personal access token (PAT) or a service account key in Asana. Make sure to store this token securely, such as in encrypted environment variables, instead of embedding it directly into your app’s code. Follow the principle of least privilege by granting the token only the permissions it needs, and make it a habit to rotate tokens regularly to enhance security.
Keep your data safe by ensuring all API calls are made over HTTPS and encrypt sensitive information both during transmission and while stored. Activate multi-factor authentication (MFA) for the Asana account managing the integration and enforce strong password requirements for users who have access to integration settings. Regular audits of logs and permissions can help you spot and address any suspicious activity early.
Additionally, stay updated on Asana’s latest security and privacy guidelines to ensure your practices align with theirs. By combining these steps with no-code security best practices, you can protect your app’s data while efficiently integrating workflows with Asana.
What can I do if the integration between AppInstitute and Asana isn’t working?
If the connection between AppInstitute and Asana isn’t working as it should, here are some steps to help you pinpoint and fix the issue:
- Check your Asana authentication: Make sure your Asana account is properly linked in the AppInstitute dashboard. If needed, re-authenticate your account since tokens can expire or be revoked.
- Verify workspace and project details: Double-check that the workspace and project IDs in your integration settings match the correct ones in Asana. Even small mismatches can lead to syncing problems.
- Review field mappings: Confirm that the fields you’ve mapped, such as task name, due date, and assignee, match the existing fields in Asana. Missing or renamed fields can throw off the integration.
- Inspect error logs: Look at the error logs in your AppInstitute dashboard. These logs can reveal issues like permission problems or rate limits, giving you clues about what’s going wrong.
If these steps don’t solve the problem, try refreshing the integration by disconnecting and reconnecting Asana in AppInstitute. Still stuck? Reach out to AppInstitute’s support team with details about the issue and your setup for further help.
Related Blog Posts
- How to Build an App Without Coding Skills
- REST API Integration in No-Code Apps
- Common Integration Issues in No-Code Platforms
- How to Manage Client Communication with No-Code Apps
Last Updated on January 6, 2026 by Becky Halls
0 thoughts on “How to Connect No-Code Apps to Asana”