
Drag-and-drop app design makes creating mobile apps easier and faster by eliminating the need for coding. With tools like AppInstitute, you can build apps visually by arranging pre-made elements (like buttons, forms, or maps) on a canvas. This approach significantly reduces development time (by 50%-90%) and costs, with subscriptions starting at $39/month.
Key benefits include:
- No coding required: Intuitive visual editors simplify the process.
- Speed: Go from concept to launch in as little as 15 days.
- Affordability: Avoid high development costs with low subscription fees.
- Multi-platform support: Create apps for iOS, Android, and Progressive Web Apps (PWAs).
- Templates: Industry-specific templates save time and effort.
- Ease of publishing: Many platforms handle app store submissions for you.
Whether you’re a small business owner or a non-technical user, drag-and-drop tools empower you to create professional apps quickly and efficiently. With features like real-time editing, push notifications, and integrated business tools, these platforms provide a practical way to establish a mobile presence without hiring developers or learning to code.
How To Build A Business App Without Any Coding – Easy No Code Drag & Drop App Builder – Jotform Apps

Core Features of Drag-and-Drop Tools
Modern drag-and-drop platforms simplify complex technical tasks, turning projects that once took months into something achievable in just days. These tools streamline the entire app creation process, from design to deployment across multiple platforms.
Visual Editor Interface
With the visual editor, you can skip traditional coding and instead drag and drop pre-built UI elements – like forms, buttons, tables, and lists – right onto a digital canvas. The platform provides a real-time preview of how your app will appear on a phone screen, so there’s no need to guess or worry about coding errors. Features like loyalty programs or booking systems are automatically integrated without additional programming. Plus, you can instantly update your app’s content without requiring users to download anything new.
To make things even easier, the editor pulls branding details directly from your business website, offering color palettes that match your existing online presence. It’s all about making the design process as seamless and intuitive as possible.
Industry-Specific Templates
For those who want a head start, ready-made templates tailored to specific industries are a huge time-saver. For example, AppInstitute offers templates designed for businesses like restaurants, salons, and coffee shops. Restaurants can set up online ordering and menu displays, salons get appointment booking systems, and coffee shops can include digital loyalty cards. These templates come with pre-configured workflows, ensuring that everything – like online ordering or loyalty programs – works right out of the box.
With over 100,000 businesses using AppInstitute to create their apps, many begin with these templates and then tweak them to fit their brand. This approach cuts down development time dramatically, transforming what could be a months-long project into something you can complete in as little as 15 days to 2 months.
Multi-Platform Support
Your app needs to work wherever your customers are, whether they’re on iOS, Android, or simply using a web link. AppInstitute’s “build once, deploy everywhere” philosophy means you design your app a single time, and the platform takes care of generating native versions for iOS and Android, along with a Progressive Web App (PWA).
PWAs are especially convenient – they launch instantly via a web link, skipping the 1–5 day review process required by app stores. Users can save the PWA to their home screen and receive push notifications, just like they would with a native app. On the other hand, native apps offer enhanced performance and deeper integration with device features like GPS and haptic feedback. To make things even easier, AppInstitute’s team handles the tricky compliance requirements for both Apple and Google app stores, removing a major technical barrier for beginners.
| Platform Type | Deployment Method | Approval Time | Key Advantage |
|---|---|---|---|
| iOS Native | Apple App Store | 1–5 Days | Optimized performance, full device integration |
| Android Native | Google Play Store | 1–5 Days | Store visibility, native UI controls |
| Progressive Web App | Instant Web Link | None | Immediate launch, no download required |
Design Best Practices for Drag-and-Drop Apps
Building an app that users love and return to requires thoughtful design choices. The difference between an app that gets abandoned and one that thrives often boils down to a few critical practices.
Prioritize User Experience
Your app’s interface should feel intuitive and provide clear guidance at every step. Visual feedback – like a cursor change, color highlight, or subtle shadow – helps users understand their actions in real time. Quick responses, such as background adjustments within 100 milliseconds, make interactions feel natural. As Page Laubheimer, Senior User Experience Specialist at Nielsen Norman Group, explains:
“Clear signifiers and clear feedback at all stages of the interaction make drag–and–drop discoverable and easy to use”.
To improve precision, consider adding magnetic snapping, which aligns objects near valid drop zones. For mobile users, ensure touch targets for draggable elements are at least 44 pixels square to prevent errors from accidental taps.
An undo option is another must-have, whether it’s a visible button or a keyboard shortcut, allowing users to recover from mistakes. Additionally, never make drag-and-drop the only way to complete a task – menu-driven alternatives like a “Move to” button are especially important for mobile users.
By focusing on a seamless, user-friendly interface, you create a foundation that reflects your brand’s professionalism and attention to detail.
Customize Templates to Match Your Brand
While templates can speed up the design process, they shouldn’t leave your app looking generic. Use the visual editor to tweak colors, fonts, logos, and layouts to align with your brand identity.
Go beyond aesthetics by tailoring functional elements to fit your business needs. For example, you might add loyalty cards for retail apps or booking forms for service-based businesses. These adjustments not only enhance usability but also make your app feel purpose-built for your audience. However, simplicity is key – avoid cluttered designs to maintain a clean, polished look that reinforces your brand image.
Test Across Devices
A great app works consistently across all devices, from desktops to smartphones. What feels smooth on a large screen may not translate well to mobile. Testing on various devices and input methods is essential to catch issues like vertical drag conflicts or non-functional haptic feedback. As Eleken, a design agency, points out:
“What feels smooth on a desktop can fall apart quickly on mobile. Designing drag-and-drop UI on touchscreens brings a whole new set of challenges: small targets and no hover states”.
For mobile users, haptic feedback – a subtle vibration when grabbing or dropping an item – offers vital confirmation without relying on visuals.
Accessibility is just as important. Keyboard users should be able to navigate with the Tab key, press Space to grab items, use Arrow keys to move them, and press Space again to drop them. Screen reader compatibility is another priority; ensure ARIA attributes work correctly. Finally, conduct real user tests. Watching people interact with your app can reveal pain points you might miss, such as moments of hesitation or confusion.
Testing across devices and user scenarios ensures your app delivers a consistent and accessible experience for everyone.
sbb-itb-539ae66
Advanced Customization with AppInstitute
Once you’ve got the basics down, AppInstitute’s no-code app-building platform offers a range of powerful tools to take your app from a basic mobile presence to a fully functional business hub. These advanced features allow you to create an app that meets the specific needs of your business.
Adding Business Features
With AppInstitute’s drag-and-drop editor, you can easily integrate advanced business tools into your app. By clicking “+Add Tabs”, you can introduce features like online ordering systems with payment options, appointment booking with customizable forms, and tools for capturing customer data that go beyond standard templates.
Push notifications let you engage users effectively, offering unlimited sends with advanced targeting options. Schedule recurring messages for regular promotions, send one-time announcements, or even set up geo-fenced alerts that activate when users enter or leave specific areas. If you’re a Pro-tier user, you’ll also have access to a dedicated Customer Relationship Management (CRM) tool. This feature helps you store contact details, track loyalty and financial stats, and communicate directly with users through a centralized Message Center.
Real-Time Editing ensures that any changes you make – whether it’s updating prices, swapping out images, or adding new promotions – are instantly reflected in your app, sparing users from having to download updates.
Improving App Performance
Making sure your app performs smoothly is just as important as the features it offers. Start by compressing images before uploading them to avoid slow load times caused by large files. The built-in analytics dashboard is another essential tool, helping you track session durations and conversion rates so you can pinpoint and address any performance issues.
For a quicker launch, consider releasing your app as a Progressive Web App (PWA). This allows users to access it immediately without waiting for app store approval, which can take anywhere from 1 to 5 days. PWAs also provide a great opportunity to gather user feedback and fine-tune performance before submitting your app to the Apple App Store or Google Play. AppInstitute manages the submission process for you, ensuring your app complies with platform guidelines.
Testing your app on real devices is key to catching issues like crashes, broken links, or layout problems that might not show up in a virtual simulator. Share your app with friends, family, or coworkers and have them test it on various devices and screen sizes to ensure a smooth user experience before launch.
Accessibility and Haptic Feedback
Designing an app that works for everyone means paying attention to accessibility. AppInstitute allows you to customize font styles, button shapes, and background patterns, making your app more user-friendly for individuals with diverse needs.
The “Grab colour schemes” tool is another handy feature. It pulls your brand’s color palette directly from your website URL, ensuring a consistent look across all customer touchpoints. Additionally, AppInstitute supports iOS, Android, and PWAs, making your app accessible to users regardless of their device or storage limitations. PWAs, in particular, are a great option for users with limited internet or storage, as they run directly in a web browser while still supporting features like push notifications.
AppInstitute Plan Comparison
AppInstitute Pricing Plans Comparison: Features and Costs
Select a plan that fits your deployment needs and desired level of support. Regardless of the plan, you’ll have access to the same intuitive drag-and-drop editor. Here’s a breakdown of what each plan includes and how much it costs.
Plan Features and Pricing
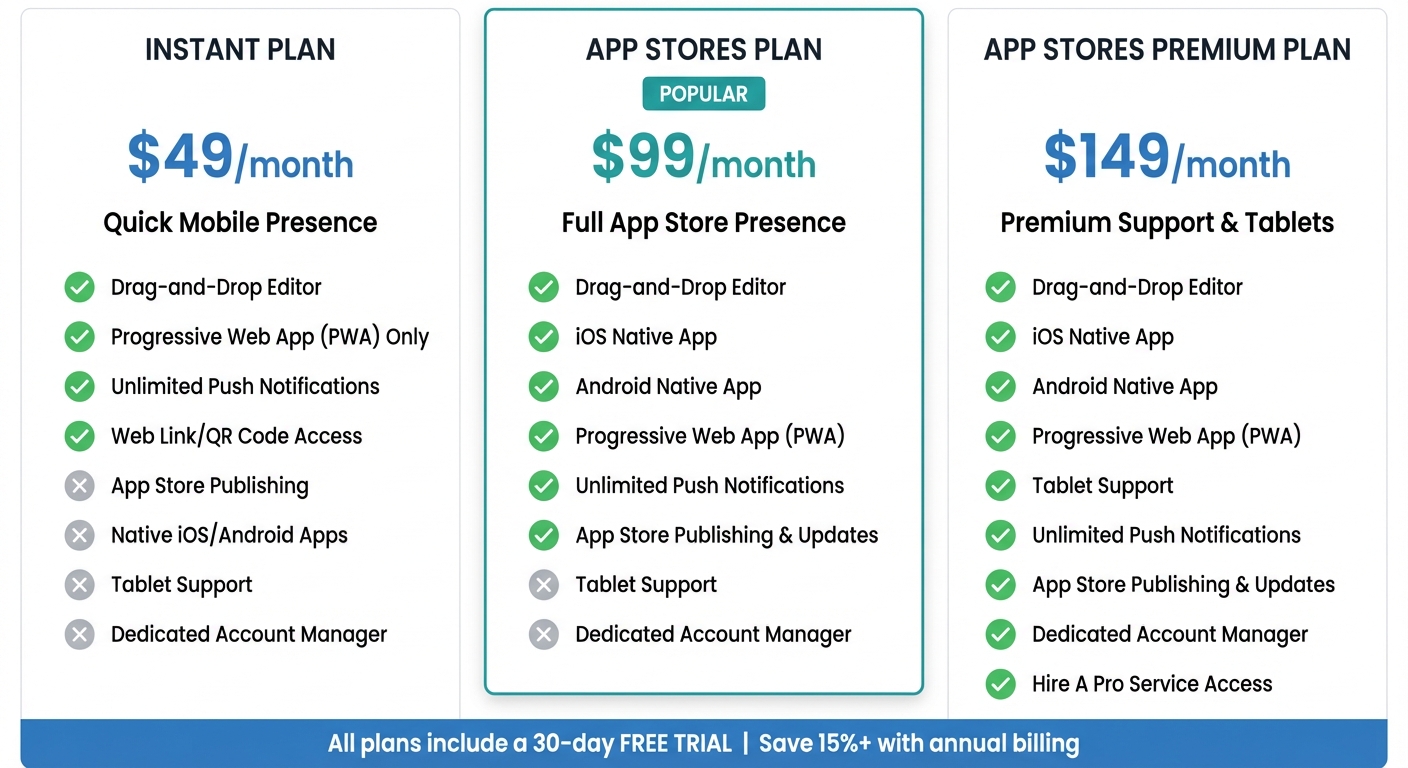
The Instant plan is priced at $49 per month and provides a quick and simple mobile presence through a Progressive Web App (PWA). Users can access your app via a web link or QR code, without requiring app store approval. This plan includes unlimited push notifications and all essential building tools, but your app won’t appear on the Apple App Store or Google Play.
The App Stores plan, available for $99 per month, takes it a step further by offering native iOS and Android app support. This includes full app store publishing and update management services, ensuring your app is listed and accessible in major app stores.
For $149 per month, the App Stores Premium plan builds on the previous tier by adding tablet support, a dedicated account manager, and access to the “Hire A Pro” service for expert assistance. This plan is ideal for those seeking high-performance functionality across multiple devices. Plus, you can save over 15% by opting for annual billing.
| Plan Name | Price (Monthly) | Drag-and-Drop Editor | Device Support | Push Notifications | App Store Submission |
|---|---|---|---|---|---|
| Instant | $49/mo | Yes | PWA Only | Yes (Unlimited) | No |
| App Stores | $99/mo | Yes | iOS, Android, PWA | Yes (Unlimited) | Yes |
| App Stores Premium | $149/mo | Yes | iOS, Android, PWA, Tablets | Yes (Unlimited) | Yes |
Every plan comes with a 30-day free trial, allowing you to build, test, and even send push notifications before committing to a subscription.
Conclusion and Next Steps
The rise of drag-and-drop app design has removed the technical hurdles that once kept small businesses out of the mobile app space. Today, over 100,000 businesses have used AppInstitute to create professional apps without writing a single line of code. With mobile apps generating close to $45 billion in revenue across the U.S. in 2023, there’s never been a better time to connect with your customers through a branded app experience.
AppInstitute makes it easy to get started with their 30-day free trial – no financial commitment required. Pick a template that matches your business goals, then use the intuitive drag-and-drop editor to add your branding, features, and content. You can launch immediately as a Progressive Web App via a simple web link or let AppInstitute’s team handle the submission process for the Apple App Store and Google Play.
Many business owners have already seen the benefits of this streamlined approach:
“Communication was superb, and we were guided through every step, from design to launch. Couldn’t praise them enough!” – Craig Meredith
To maximize your app’s impact, focus on features that drive results. Use push notifications to keep customers engaged, loyalty programs to encourage repeat visits, and booking systems to simplify appointments. Thanks to low-code tools, which can cut development time by 50% to 90% compared to traditional methods, you could have a fully functional app ready in just weeks.
If you’d rather leave the heavy lifting to the experts, AppInstitute’s “Hire A Pro” service lets dedicated app builders take over. Plans start at $49/month, and with annual billing, you can save over 15%. Ready to unlock new revenue opportunities? Launch your app today.
FAQs
How do drag-and-drop app design tools save time and money compared to traditional app development?
Drag-and-drop app design tools provide a quicker and more budget-friendly alternative to traditional app development. Building a custom-coded app can take anywhere from 3 to 6 months for simpler projects and over a year for more intricate ones. On top of that, the costs can be steep – ranging between $50,000 and $500,000, depending on the app’s complexity. In contrast, drag-and-drop platforms let you create apps in just days or weeks, often for only a few thousand dollars.
These platforms simplify the process by offering visual editors that automatically generate the necessary code. This eliminates the need for large development teams and reduces the time spent on extensive testing. For small businesses and entrepreneurs aiming to launch professional apps quickly without breaking the bank, these tools are a game-changer.
What are the benefits of using industry-specific templates in drag-and-drop app design?
Industry-specific templates offer a ready-made framework designed to meet the unique needs of particular industries. These templates come preloaded with the workflows, terminology, and design elements relevant to the field, so you can skip the hassle of starting from scratch and dive straight into customization.
With these templates, you can create apps that not only look polished but also maintain a cohesive brand identity. Plus, any updates – like tweaking colors or adding new fields – are automatically applied across all instances, saving you time on maintenance and keeping your app current.
AppInstitute provides a range of professionally crafted templates tailored for industries such as retail, food and drink, education, and events. These templates streamline the app-building process, making it quicker, more affordable, and easier to deliver apps that resonate with your audience.
How can I make sure my drag-and-drop app is accessible and user-friendly on all devices?
Creating a drag-and-drop app that’s easy for everyone to use starts with solid accessibility principles. Begin by making your app perceivable: use high-contrast colors, scalable text, and touch-friendly elements (at least 44×44 pixels). Ensure it’s operable by including clear drag handles, keyboard shortcuts, and labels that work well with screen readers. Keep it understandable by sticking to simple language, consistent gestures, and logical navigation paths. Finally, ensure it’s robust by using standard components that work seamlessly with assistive technologies.
For usability across all devices, design responsive layouts that adjust smoothly to various screen sizes, from smartphones to desktops. Provide clear visual feedback during interactions – like cursor changes, highlights, or ghost images for drag-and-drop actions. Make interactive elements large and easy to interact with, and avoid hiding or making important targets hard to find. Regularly test your app on different devices and with users who rely on assistive tools, such as screen readers or voice control. These practices can help you build an app that’s easy to navigate, inclusive, and effective for all users.
Related Blog Posts
- How to Build an App Without Coding Skills
- Ultimate Guide to Faster Drag-and-Drop App Development
- Top Cross-Platform Tools for Compatibility Solutions
- Cost Breakdown: Building Apps with No-Code Tools
Last Updated on December 31, 2025 by Becky Halls
0 thoughts on “Ultimate Guide to Drag-and-Drop App Design”