Mobile apps have become indispensable tools for businesses of all sizes. In the United States, mobile apps generated almost $45 billion in 2023 and the market shows no sign of slowing down. Even as early as 2022, 62% of businesses had an app or were in the process of creating one.
As consumer preferences shift toward mobile over desktop for virtually all digital services, developing a quality app should be a priority for every business.
Apps add value to customers through smoother interactions, easier checkouts, and engagement. The added value can lead to an improved brand reputation, a more loyal customer base, and most importantly, increased conversions.
In this article, we teach you how to make an app, taking you through the entire process, step-by-step.
Step #1: Define the Goals of the App
The first step in creating an app is to identify its goals clearly. Ask yourself what the app’s primary purpose is. Goals should align with the broader objectives of your business.
They should also directly address the needs of your customers. At this stage, it’s important to get as specific as possible. By narrowing your focus, you not only make your app more relevant to the audience but also increase its chances of standing out in a crowded marketplace.
For example, a West Coast real estate business focused on niche markets may benefit from an app that highlights unique property listings, like tiny homes for sale in Texas or studio apartments in San Francisco.
By honing in on the specific needs of the customer base, it’s easier to set clear goals, such as increasing property inquiries or improving buyer engagement. These objectives provide the groundwork for later steps of app development.
Step #2: Understand Your Target Audience
Developing an app that truly connects with users starts with understanding your target audience. Consider factors such as the age range, interests, tech-savviness, and challenges your target market currently faces. Then, focus on how these impact their specific needs.
For example, if you’re an accident and injury law firm, you’ll need an app that provides legal resources quickly and easily. In this type of scenario, users are likely on the app to track case progress, upload information, or seek help, all of which are highly stressful. The functionality of the app should be straightforward.
In contrast, a travel or tourism app may give you more leeway in terms of the design. The audience isn’t logging into the app under stress. Understanding your market fully is an essential step in delivering real value.
Use tools like surveys, app store reviews, or direct feedback for a better understanding. Creating user personas is always helpful.
Step #3: Conduct Market Research
In addition to deep diving into your audience, you must study the market. Market research helps you determine your place among competitors. If there are established apps that already provide exactly what you had in mind, investing in the development of a similar app may be a waste of resources.
Analyze the market and identify potential gaps or niches where your business can provide value. This doesn’t mean straying from the core values of your business or the predetermined goals. Rather, it involves pinpointing where your app can stand out among the competition.
Analyze similar apps within your industry to identify trends, features, and design elements that resonate with users. Next, look for gaps that your app could fill. These could include a smoother user interface, addressing overlooked pain points, or integrating new innovative features. Read through app store reviews to uncover specific frustrations that your app could address.
For example, a food delivery service might notice that a competitor lacks real-time tracking updates or struggles with accurate delivery estimates. By prioritizing these features in your app, you could meet user demand and gain a competitive edge.
Step #4: Plan App Features
Having completed your research and aligned the findings with your goals, it’s time to outline the app’s features. First and foremost, these should revolve around your app’s core functions. Don’t try to create an all-singing, all-dancing platform that does a million different things, at least not right away.
Initially, the focus should be on delivering quality key features that provide the most value. A good way to do this is to create lists of essential components and nice-to-haves.
In a nutshell, this helps you prioritize what’s important. Depending on the nature of your business, these will vary.
Common core features include user registration, notifications, payment processing, or any other functionality that’s critical to the app’s success. For example, if you’re building an e-commerce platform, a smooth checkout process with secure payment options should be priorities.
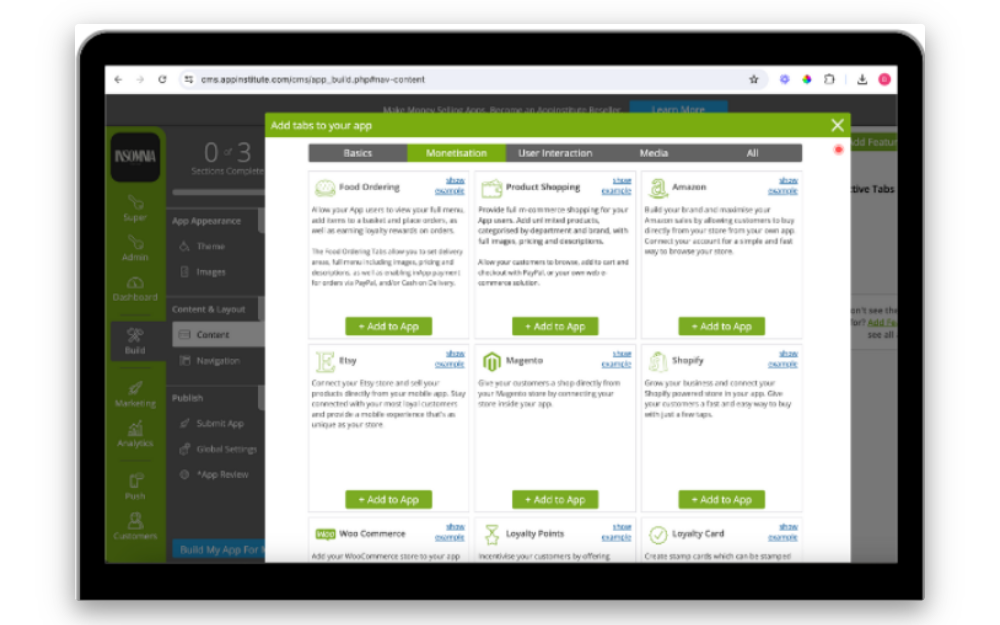
Once the essential features are identified, you can explore optional extras that will enhance the app. Remember, with every added feature, you’ll increase the cost and time requirements of development and maintenance.
That’s why it’s generally best to keep things simple in the early stages and gradually add more features. Plus, when you launch the app, you’ll gain valuable user feedback, making it easier to determine areas to add value. For example, users may look for advanced search filters, social sharing capabilities, or personalized recommendations.
If you try to do too much, too soon, you may end up wasting time and money on extra features that users don’t want.
Step #5: Choose the Right App-Building Platform
A decade ago, building an app required advanced coding skills, a team of developers, and a sizeable budget. For small businesses, app creation was overwhelming, expensive, and most likely, not an option.
Today, no-code platforms, like AppInstitute, have revolutionized the process, removing barriers and making app development accessible to everyone. Essentially, no-code services mean you don’t need technical expertise or a hefty budget to create a professional app.
With AppInstitute, you can focus on your app’s design, functionality, features, and user experience, without the complexities of coding or backend development. It simplifies the entire process without sacrificing quality, allowing your business to launch apps faster and at a fraction of the cost of traditional methods.
No-code apps are increasing in popularity, particularly among standard businesses that may previously not have had an app, like a coffee shop or café.
However, for businesses that require an app with complex integrations, frequent customization, and massive scalability, no-code might not be the best approach.
Step #6: Customize the App’s Design and Features
This step is where you bring your app to life. Begin by aligning the app’s visual elements, such as color schemes, logos, and fonts. Ensure the look and feel match your branding guidelines.

Next, focus on adding features that will enhance your app’s functionality and help you meet your goals. You should already have your list of priority and nice-to-have features from step #4. Remember to keep the user experience in mind, ensuring the layout is intuitive and the features make sense.
Step #7: Preview and Test the App
Testing your app is a mandatory step for every single business, from personal injury law firms to restaurants. First impressions are important so you can’t risk launching an app that hasn’t been rigorously tested.
Start by using a preview tool. This is made easy with app builders, like AppInstitute, with built-in real-time previewing. Go through each function on various devices and take note of any issues, flaws, or snag points. Conduct in-depth quality assurance (QA) testing to check for bugs, broken links, or performance issues.
App security and data protection should also be prioritized. Safeguarding user information is vital, especially if your app involves payments or personal data.
If possible, gather user feedback by sharing the app with small control groups of customers or team members. Their insights can help you refine the app’s functionality and improve the overall experience.
Step #8: Launch the App
After careful testing, you’re ready to launch. The first step here is to prepare submissions to the Google Play Store and the Apple App Store. Each platform has specific requirements, like descriptions, high-quality screenshots, and icons, so make sure your materials are optimized and meet their guidelines.
This can be tedious but it’s essential. AppInstitute makes the entire launch process seamless. You’re guided the entire way and can even benefit from a dedicated app builder if you’re unsure about anything. Using a professional service can make a big difference when it comes to improving discoverability.
After submission, monitor the approval processes closely and address any feedback from the app store promptly. A successful launch builds the foundations for a high-performing app.
Post-Launch Steps
When your app goes live, there’s still work to do. Here are the key steps.
- Marketing: Promote the app via social media, email marketing campaigns, your website, in-store signage, or any other advertising resources that you use to drive downloads and awareness. Make sure the app is a key part of your marketing strategies.
- Set and track KPIs: Measure metrics, like user engagement, download rates, retention, and in-app purchases to monitor success. Benchmarking is important to conceptualize performance.
- Further testing and feedback: Continue to test and gather feedback to identify areas for improvement.
- Continuous development: Keep your app fresh and relevant by releasing updates, fixing bugs, and adding new features to meet demands.
- Maintenance and support: Regularly monitor the app and provide prompt customer support.
How to Build an App with AppInstitute
Building an app with AppInstitute is straightforward, even if you don’t have any prior coding experience. In fact, the process is designed for businesses without technical expertise.
With our no-code platform, you can build a fully functional and professional app in just a few steps. This allows you to skip the complexities of traditional development. Here’s the basic idea of how AppInstitute works.
- Choose a template: Start by selecting a pre-designed template tailored to your business type. We offer a number of different starter templates that provide specific design components and features that work best in set industries, such as retail, food delivery, or booking services.
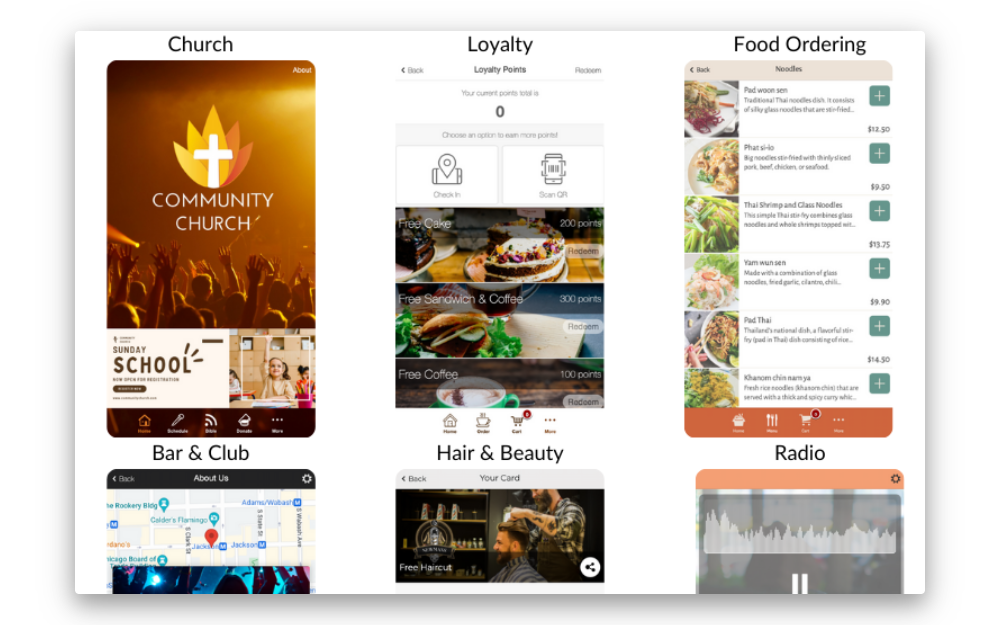
All templates are professionally designed and provide an excellent foundation for customization. If you don’t fancy using a template, you can design your app from scratch.
- Customize your features and design: Use AppInstitute’s intuitive drag-and-drop editor to personalize your app. Adding features like booking tools, payment gateways, or push notifications couldn’t be easier. You can also adjust colors, fonts, and layouts that match your existing branding.
- Preview and test: AppInstitute allows you to preview and test your app in real time. So, as soon as you make an adjustment, you can check how it looks and functions. Resolving issues and tweaking the layout is fast and efficient.
- Publish your app: Once you’re satisfied with the app, AppInstitute guides you through publishing it to the App Store, Google Play, or as a progressive web app (PWA).
AppInstitute provides a “Hire a Pro” service that offers a dedicated app builder to work with you from start to finish.
Creating an app may seem daunting and cumbersome but by following these steps, you can streamline the process. With AppInstitute, building a professional app is easier and more accessible than ever, even without technical skills. Take the first step today by getting in touch with the AppInstitute team.
Last Updated on January 25, 2025 by Ian Naylor
0 thoughts on “Creating an App: A Step-by-Step Guide”